Use external SSD as /home
Step 1: Disable iCloud apps and sign out of your Apple ID
- Open System Preferences (or System Settings, depending on your macOS version).
- At the top, select your Apple account.
- Go to the iCloud section and click See All.
- Turn off all applications that sync data with iCloud. You will see a warning that copies of photos, documents, and other data will be removed from your internal storage. Select remove, since all that information will still remain in the cloud.
- Once everything is disabled, go back and click Sign Out of your Apple account.
This clears a large portion of your Mac’s internal storage by removing the iCloud data that was stored there. It is essential to sign out before copying the home folder, otherwise you may run into errors when trying to copy your User Library.
Step 2: Format the external drive as APFS
- Connect your external drive to the Mac.
- Open Disk Utility.
- Select the drive you want to use and click Erase.
- Choose APFS as the format (it can also be APFS Encrypted, we will talk about that later).
- Assign a name (for example, “Home X”) and click Erase.
APFS is Apple’s recommended file system and helps avoid compatibility issues. Many new drives come formatted as exFAT, which is not ideal for this process.
Quick tip: How to show the user Library folder
- Open your internal home folder (your user folder).
- Go to View in the Finder menu bar and select Show View Options.
- Enable Show Library Folder.
If you do not see it, do not worry, even if the Library folder is hidden, it will still be copied when you drag the entire home folder.
Step 3: Copy your home folder to the external drive
- Drag your home folder (the one with your username) to the newly formatted external drive.
- Enter your administrator password if prompted.
Once the copy is complete, all your files, including the Library folder (which contains app data and settings), will be there. To verify it, you can use Command + Shift + Period (.) to show hidden files.
Step 4: Copy the Applications folder to the external drive
- Inside your external drive, you can create a folder called Applications or include the apps directly inside your new home folder, it is your choice.
- Drag your manually installed applications (for example, Final Cut Pro, GarageBand, games, etc.) from /Applications on your internal drive to the Applications folder on your external drive.
Native system applications (Safari, Mail, etc.) cannot be moved or removed, since they come built into macOS. However, this is usually not a big issue because they take up very little space (around 1–2 GB total), while larger apps such as games and editing suites use much more storage.
Step 5: Activate the home folder on the external drive
Now we need to tell macOS that your home folder is on the external drive:
- Go to System Preferences > Users & Groups (or Users & Groups in System Settings).
- Right-click (or Ctrl + click) on your user and select Advanced Options.
- Under Home directory, click Choose.
- Browse to your external drive and select the folder with your username (not just the drive itself, but the actual folder containing Documents, Music, etc.).
- Confirm the path, which should look like:
Volumes/YourExternalDriveName/YourUsername - Click OK and restart your Mac.
If you see an error saying that “System Preferences canceled the restart,” simply press Retry and restart.
After logging in, you will notice that the active home folder is now the one on the external drive. It will have the standard personal folder icons (Documents, Music, Movies, etc.), while the internal one will appear as regular folders.
Step 6: Sign back into your Apple ID and re-enable iCloud
Once you have logged in with your home folder on the external drive:
- Go back to System Preferences > Apple ID.
- Sign in with your Apple account.
- Re-enable the iCloud services you previously disabled (iCloud Drive, Photos, etc.).
Your iCloud content (for example, your iCloud Photo Library) will automatically download to this new location, which is now the home folder on the external drive. If you have an Ethernet connection, it is recommended to speed up the process.
Step 7: Remove unnecessary applications from your internal drive
Now that your applications are moved to the external drive:
- Open your internal Applications folder.
- Remove (by dragging to Trash) the apps you already copied to the external drive.
- You may see a message that some applications cannot be removed (system apps). This is normal.
- Empty the Trash again to free up space.
Step 8: Clean up the internal home folder
- Go to Finder and enter your old internal home folder.
- Delete files from Documents, Downloads, Pictures, etc. that already exist on the external drive.
- Make sure to check the Finder path bar so you do not accidentally delete anything from the wrong disk.
- You can also clean up the internal Library folder (caches, iOS backups in “MobileSync,” Steam content, and other game data, etc.).
The goal is to free as much space as possible on the internal drive so you do not have to pay for larger internal storage when you can use a much more affordable SSD or external drive.
Step 9: Make external drive apps appear in Launchpad (using symbolic links)
Launchpad only automatically recognizes apps installed in the internal Applications folder. Because of this, you may see blank icons with question marks. If you want your external apps to appear in Launchpad, follow these steps:
- Open Terminal (located in Applications/Utilities on the internal drive).
- Type:
ln -s $app_path(with a space at the end). - Drag the application from your Applications folder on the external drive into the Terminal window.
- Then drag the internal Applications folder into the Terminal window.
- Press Enter.
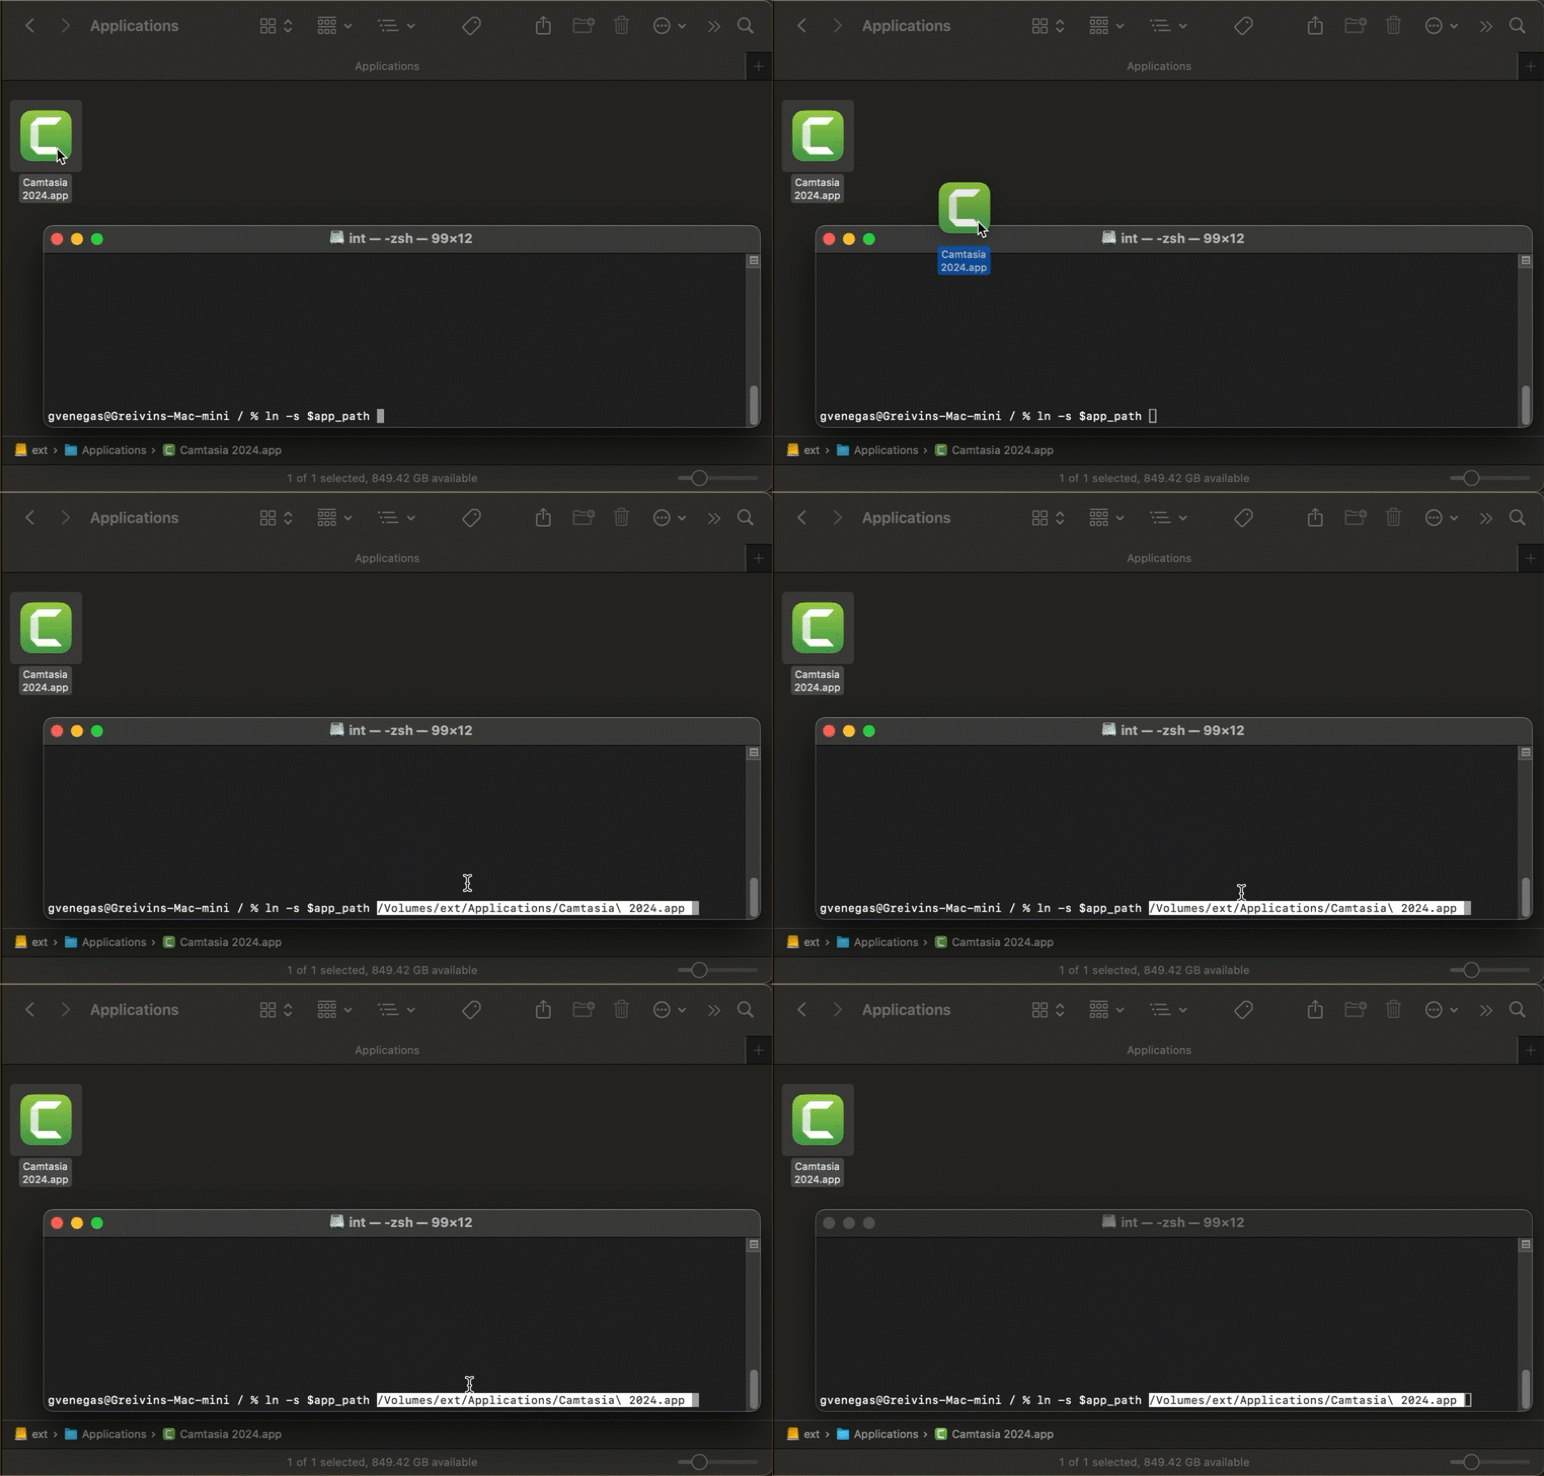
This creates a symbolic link (symlink) inside the internal Applications folder, allowing Launchpad to recognize it. The app will still run from the external drive but remain accessible through Launchpad.
Step 10: Create a secondary administrator account (or use it first)
It is highly recommended to have an administrator account separate from your main one. Two approaches:
- Create it at the end (as shown in this video):
- Go to System Preferences > Users & Groups, and click the + sign to add a new administrator account.
-
If one day you forget the external drive or it stops working, you will still be able to log in with this backup account and troubleshoot.
-
Create it at the beginning (additional tip suggested by viewers):
- Start the Mac using this secondary administrator account and perform all the copy steps from there.
- This way, you would not need to sign out of iCloud in your main account or re-download everything.
Either method works, though the second can save time on iCloud re-downloads.
Security considerations: Encrypt or not encrypt your external drive
- If you disconnect your external drive and connect it to another Mac, anyone could access your files (Documents, Photos, etc.) unless the drive is encrypted or FileVault is enabled.
- FileVault encrypts your internal drive, but not necessarily the external one.
- Formatting the external drive as APFS Encrypted prevents anyone from accessing your data without the password. However, this may cause issues during login because there is no direct way to enter the passphrase at startup. An alternative is:
- Log in using the secondary (internal) account
- Manually mount the external drive by entering the password
- Then log in to your main account (the one stored on the external drive)
I am still researching better ways to handle encryption for an external home folder, so stay tuned for a future video where I will cover the security options in more detail.
Conclusion
And that is all for today. Now you know how to move your home folder to an external drive on macOS. This can save you a lot of money by avoiding the need to pay for larger internal storage in your Mac, while also giving you the flexibility to expand or replace your storage more easily.